Ever since I first heard of Jupyter, years ago, I must admit that I’ve been kind of envious of Python devs. While I dabble some in python it is far from my primary language of choice. Just the ease of being able to write your code in a notebook format with markdown in between code-blocks to help with further explanation, it’s not difficult to see how useful this could be.
Whether you’re just documenting how to do something for yourself or you want to share it, so it’s more easily understood by others. A notebook can be a world of difference.
Unfortunately I’m a little late to the party on this one, but recently I’ve had a chance to try out VSCode’s .Net Interactive Notebooks! And let me just say it’s pretty much exactly how I would have imagined it.
Setup
To get started you’re going to need to setup a few things first:
Once you have these set up you’re ready to go! No need to install Python, or Anaconda, or Jupyter, or anything else! Big shout out to the VS Code team at Microsoft for making it easy.
Getting Started
Now that you have everything in place it’s time to get started! Open your command pallet (Ctrl+Shift+P) and choose the option for .NET Interactive: Create new blank notebook.

Once you do this you’ll then be prompted to choose your format:

But what are these?
IPYNB
This is a fairly popular format that is typically used by Jupyter notebooks, as such there is already plenty of tools that have been created to work with these and another (possibly) major difference is that this actually stores the output of your code in the notebook itself. So if you’re working with sensitive information be mindful that this data will be stored in the notebook file.
DIB
This format is an experimental format created by Microsoft that ONLY works with .NET Interactive. The reason they went this route was to avoid “introducing potential compatibility issues into .ipynb”. As such it is currently only used by VSCode but also it doesn’t store the output of the code in the notebook file.
I personally just went with IPYNB since it’s widely used and not still in an experimental state. But ultimately it’s completely up to you which format.
Working inside the notebook
After choosing your format you’re left with an empty notebook with one empty cell
![]()
Now that you’re here you can start hacking away! Simply hover your mouse of the bottom of the block and two options will appear that will allow you to create a new block for either Code or Markdown.

Using multiple languages
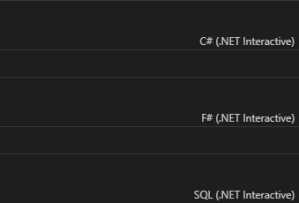
Another neat little feature that I wanted to note is that you can have multiple blocks of code in a notebook with different languages. In order to change a block’s language, on the far-right side of your screen you should see the current language [probably C# (.NET Interactive)]. If you click on that a box should pop-up allowing your to change that block’s language.

By doing this you can have multiple languages in one notebook!
Wrap-up
Sorry for the short blog post. I know I haven’t posted in a while, but still wanted to share this to others out there. As consolation I offer you a notebook on creating an Authorization header for SecureAuth.
Save the following text to a textfile with the extension .ipynb and open with VSCode to see the notebook in action!
{
 "cells": [
  {
   "cell_type": "markdown",
   "metadata": {},
   "source": [
    "# Generating Authorization Header for [SecureAuth](https://www.secureauth.com/)\r\n",
    "\r\n",
    "This notebooks describes how to generate an authorization header for the SecureAuth Authentication API using C#.  The [documentation for PowerShell](https://support.secureauth.com/hc/en-us/articles/360020784892-How-to-generate-an-Authorization-header-for-the-SecureAuth-API-using-Powershell) was used as a reference and may be refered to if need-be."
   ]
  },
  {
   "cell_type": "markdown",
   "metadata": {},
   "source": [
    "The first item that is required is to organize all required information.  Typically the timestamp will be generated when the request is created.  The Application Id and Key are both provided by SecureAuth, more details may be found in the [Authentication API Guide](https://docs.secureauth.com/2006/en/authentication-api-guide.html)."
   ]
  },
  {
   "cell_type": "code",
   "execution_count": null,
   "metadata": {
    "dotnet_interactive": {
     "language": "csharp"
    }
   },
   "outputs": [],
   "source": [
    "var method=\"GET\";\r\n",
    "var timestamp = \"Fri, 14 May 2021 19:55:20.597 GMT\";\r\n",
    "var appId=\"c655ca3c5d5640a79f462084d34dada8\";\r\n",
    "var uri = \"/secureauth254/api/v2/users/49137\";\r\n",
    "var key = \"77c1a1fa63eb499155d730ae66cfe77a48363990c64cc49a8189244f4c88d08a\";"
   ]
  },
  {
   "cell_type": "markdown",
   "metadata": {},
   "source": [
    "Our next step is to create the message.  Since this is a 'GET' request there will be no message body that we have to concern ourselves with.  Here we use [string interpolation](https://docs.microsoft.com/en-us/dotnet/csharp/language-reference/tokens/interpolated) for readability."
   ]
  },
  {
   "cell_type": "code",
   "execution_count": null,
   "metadata": {
    "dotnet_interactive": {
     "language": "csharp"
    }
   },
   "outputs": [],
   "source": [
    "var message = $\"{method}\\n{timestamp}\\n{appId}\\n{uri}\";"
   ]
  },
  {
   "cell_type": "markdown",
   "metadata": {},
   "source": [
    "Our next step is to grab the bytes for the key and the message.  The trick to this is that the key is a Hexadecimal string, this will need to be handled appropriately.  To do this, I have the static method 'HexStringToByteArray' below, which is a simple LINQ call."
   ]
  },
  {
   "cell_type": "code",
   "execution_count": null,
   "metadata": {
    "dotnet_interactive": {
     "language": "csharp"
    }
   },
   "outputs": [],
   "source": [
    "static byte[] HexStringToByteArray(string hex)\r\n",
    "{\r\n",
    "\treturn Enumerable.Range(0, hex.Length)\r\n",
    "\t\t\t\t\t .Where(x => x % 2 == 0)\r\n",
    "\t\t\t\t\t .Select(x => Convert.ToByte(hex.Substring(x, 2), 16))\r\n",
    "\t\t\t\t\t .ToArray();\r\n",
    "}\r\n",
    "\r\n",
    "//Grab the bytes here\r\n",
    "var keyBytes = HexStringToByteArray(key);\r\n",
    "var messageByte = Encoding.UTF8.GetBytes(message);"
   ]
  },
  {
   "cell_type": "markdown",
   "metadata": {},
   "source": [
    "Now that we have the bytes we have to create an HMAC SHA256 hash of the message's byte array using the key.  The result is then Base64 encoded."
   ]
  },
  {
   "cell_type": "code",
   "execution_count": null,
   "metadata": {
    "dotnet_interactive": {
     "language": "csharp"
    }
   },
   "outputs": [],
   "source": [
    "var hmacProvider = new System.Security.Cryptography.HMACSHA256(keyBytes);\r\n",
    "var computedHash = hmacProvider.ComputeHash(messageByte);\r\n",
    "var hmac = Convert.ToBase64String(computedHash);"
   ]
  },
  {
   "cell_type": "markdown",
   "metadata": {},
   "source": [
    "Once we have this done, the final step would be to concatenate \"Basic\" to the returned Base64 value.  The result would ultimately look like this:\r\n",
    "\r\n",
    "```\r\n",
    "Basic U1AIyLQ+AVCeHAvQ/6+moHaz6oUK89V/ZH86trV8WHw=\r\n",
    "```\r\n",
    "\r\n",
    "However, for now since I already know what the value **should** be we will just compare the two and see if everything is working correctly."
   ]
  },
  {
   "cell_type": "code",
   "execution_count": null,
   "metadata": {
    "dotnet_interactive": {
     "language": "csharp"
    }
   },
   "outputs": [
    {
     "data": {
      "text/plain": [
       "True\r\n"
      ]
     },
     "output_type": "unknown"
    }
   ],
   "source": [
    "var hmacTest = \"U1AIyLQ+AVCeHAvQ/6+moHaz6oUK89V/ZH86trV8WHw=\";\r\n",
    "Console.WriteLine(hmacTest == hmac);"
   ]
  },
  {
   "cell_type": "markdown",
   "metadata": {},
   "source": []
  }
 ],
 "metadata": {
  "interpreter": {
   "hash": "9ae944146af7e786f930ac4afe29c1213fd49885e8a14eba06a23185c347e808"
  },
  "kernelspec": {
   "display_name": ".NET (C#)",
   "language": "C#",
   "name": ".net-csharp"
  },
  "language_info": {
   "file_extension": ".cs",
   "mimetype": "text/x-csharp",
   "name": "C#",
   "pygments_lexer": "csharp",
   "version": "9.0"
  }
 },
 "nbformat": 4,
 "nbformat_minor": 2
}